Installing an IP camera step by step tutorial
IP camera
IP cameras are gaining in popularity for its high definition picture quality, they are not expensive as they were in the past, many CCTV installers have started using IP cameras. The biggest problem with IP camera is to understand how it works, this step by step approach explains how to install an IP camera. There are quite a few types of IP cameras in the market and we have taken one of the best selling generic IP camera and software.
Step 1
Planning
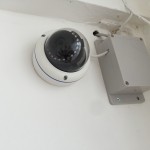
It is a good idea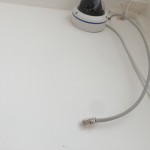 to draw a floor plan with camera locations, this will help you in deciding what type of cameras to buy. The first step is to identify the location and the purpose of the camera. After identifying them, you can mount the camera and junction box, please note that some cameras may have a deep base for cable management, but this particular camera needs a junction box to hide cable connections like RJ45 connectors and power leads.
Step 2
Cables
You may buy a PoE camera or a standard IP camera, if it is a PoE camera, you only need one CAT5 cable. And if it is a standard IP camera, you should run a separate cable for power and we recommend that you either use another CAT5 cable and double the pairs for power or you can use 1mm² 2 core cable. In this example we are using CAT5E cable and doubling it for power, blue and white-blue are used for negative and brown and white-brown are used for positive, this makes it easy for anyone to understand.Step 3
Connecting RJ45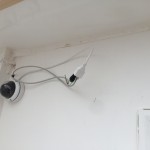
IP cameras work with data cable, therefore you need to connect RJ45 connectors at the both ends of the cable, once you have connected RJ45, you should then connect DC lead (direct current) at the both ends of the cable. After you have successfully connected RJ45 and DC leads, now it is the time to check whether they are working properly.
Step 4
Cable test
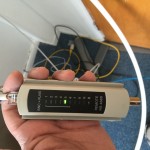 In the process
 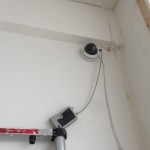 of running cable for a long distance, you may have accidentally damaged the cable or tampered with them. In order to make sure that the cables are working, you should check the RJ45 using cable tester and also the DC leads using a multimeter.
Step 5
IP camera and storage
IP cameras can work on their own, however, not all IP cameras come with an inbuilt storage, so it is a good idea to connect a storage device to an IP camera. In this example, we are connecting our IP camera to a dedicated NVR with an inbuilt hard disk.Step 6
Comp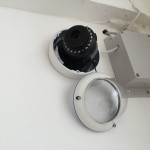 atibility of an IP camera
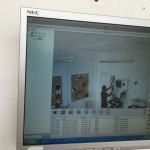
Once your IP camera and NVR are connected together and if they are using the same protocol, for example ONVIF, the IP camera may immediately appear on the NVR’s screen, otherwise you may have to manually program them and it is quite straightforward.
Step 7
Final step
After the successful synchronization of the IP camera, the final step is to name the camera and start recording it to your NVR. Learn more about CCTV installation